Organizing Wonders
  • Home
  • Contact Me
  • Meet Tanya
  • Media
    • Photos
  • What I Do
    • FAQ
    • Testimonials
  • Resources
    • Donating
    • Junk Mail
    • Recycling
  • My Blog

Archive for Simple and Organized

Organizing Barbies

By Tanya Whitford, CPO® on September 7, 2016 No Comments

Like children, Barbies bring all kinds of stuff with them. There are so many different dolls, clothes, shoes, accessories, places to live, and modes of transportation! What do you do when you child wants their room to be a Barbie wonderland? First off- you set limits. (I never had a Barbie Dreamhouse. I made furniture out of shoe boxes and tissue boxes!) And you give them the tools to be able to keep their things in order. It is hard to play Barbies when you can’t find matching pairs of shoes or Ken’s only shirt.

Dobarbies-upright
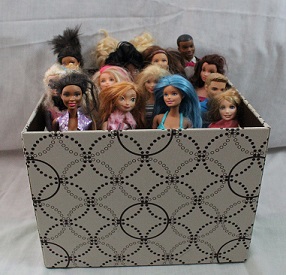
lls– I like to use a large Rubbermaid Bento box that has built in dividers. I put all the Barbies standing upright so you can see them. They look a lot happier this way than dumped in a bin. You could also use an over the door shoe pocket holder to put dolls, but kids can’t reach that high to utilize all the pockets.

Clothes– Another Bento box is perfect for clothes. Put all the dresses in one section, tops in another, etc. If it is too hard to keep them in categories- simply keeping all the clothes together in one bin is better than mixing them with small accessories.

barbie-accessories
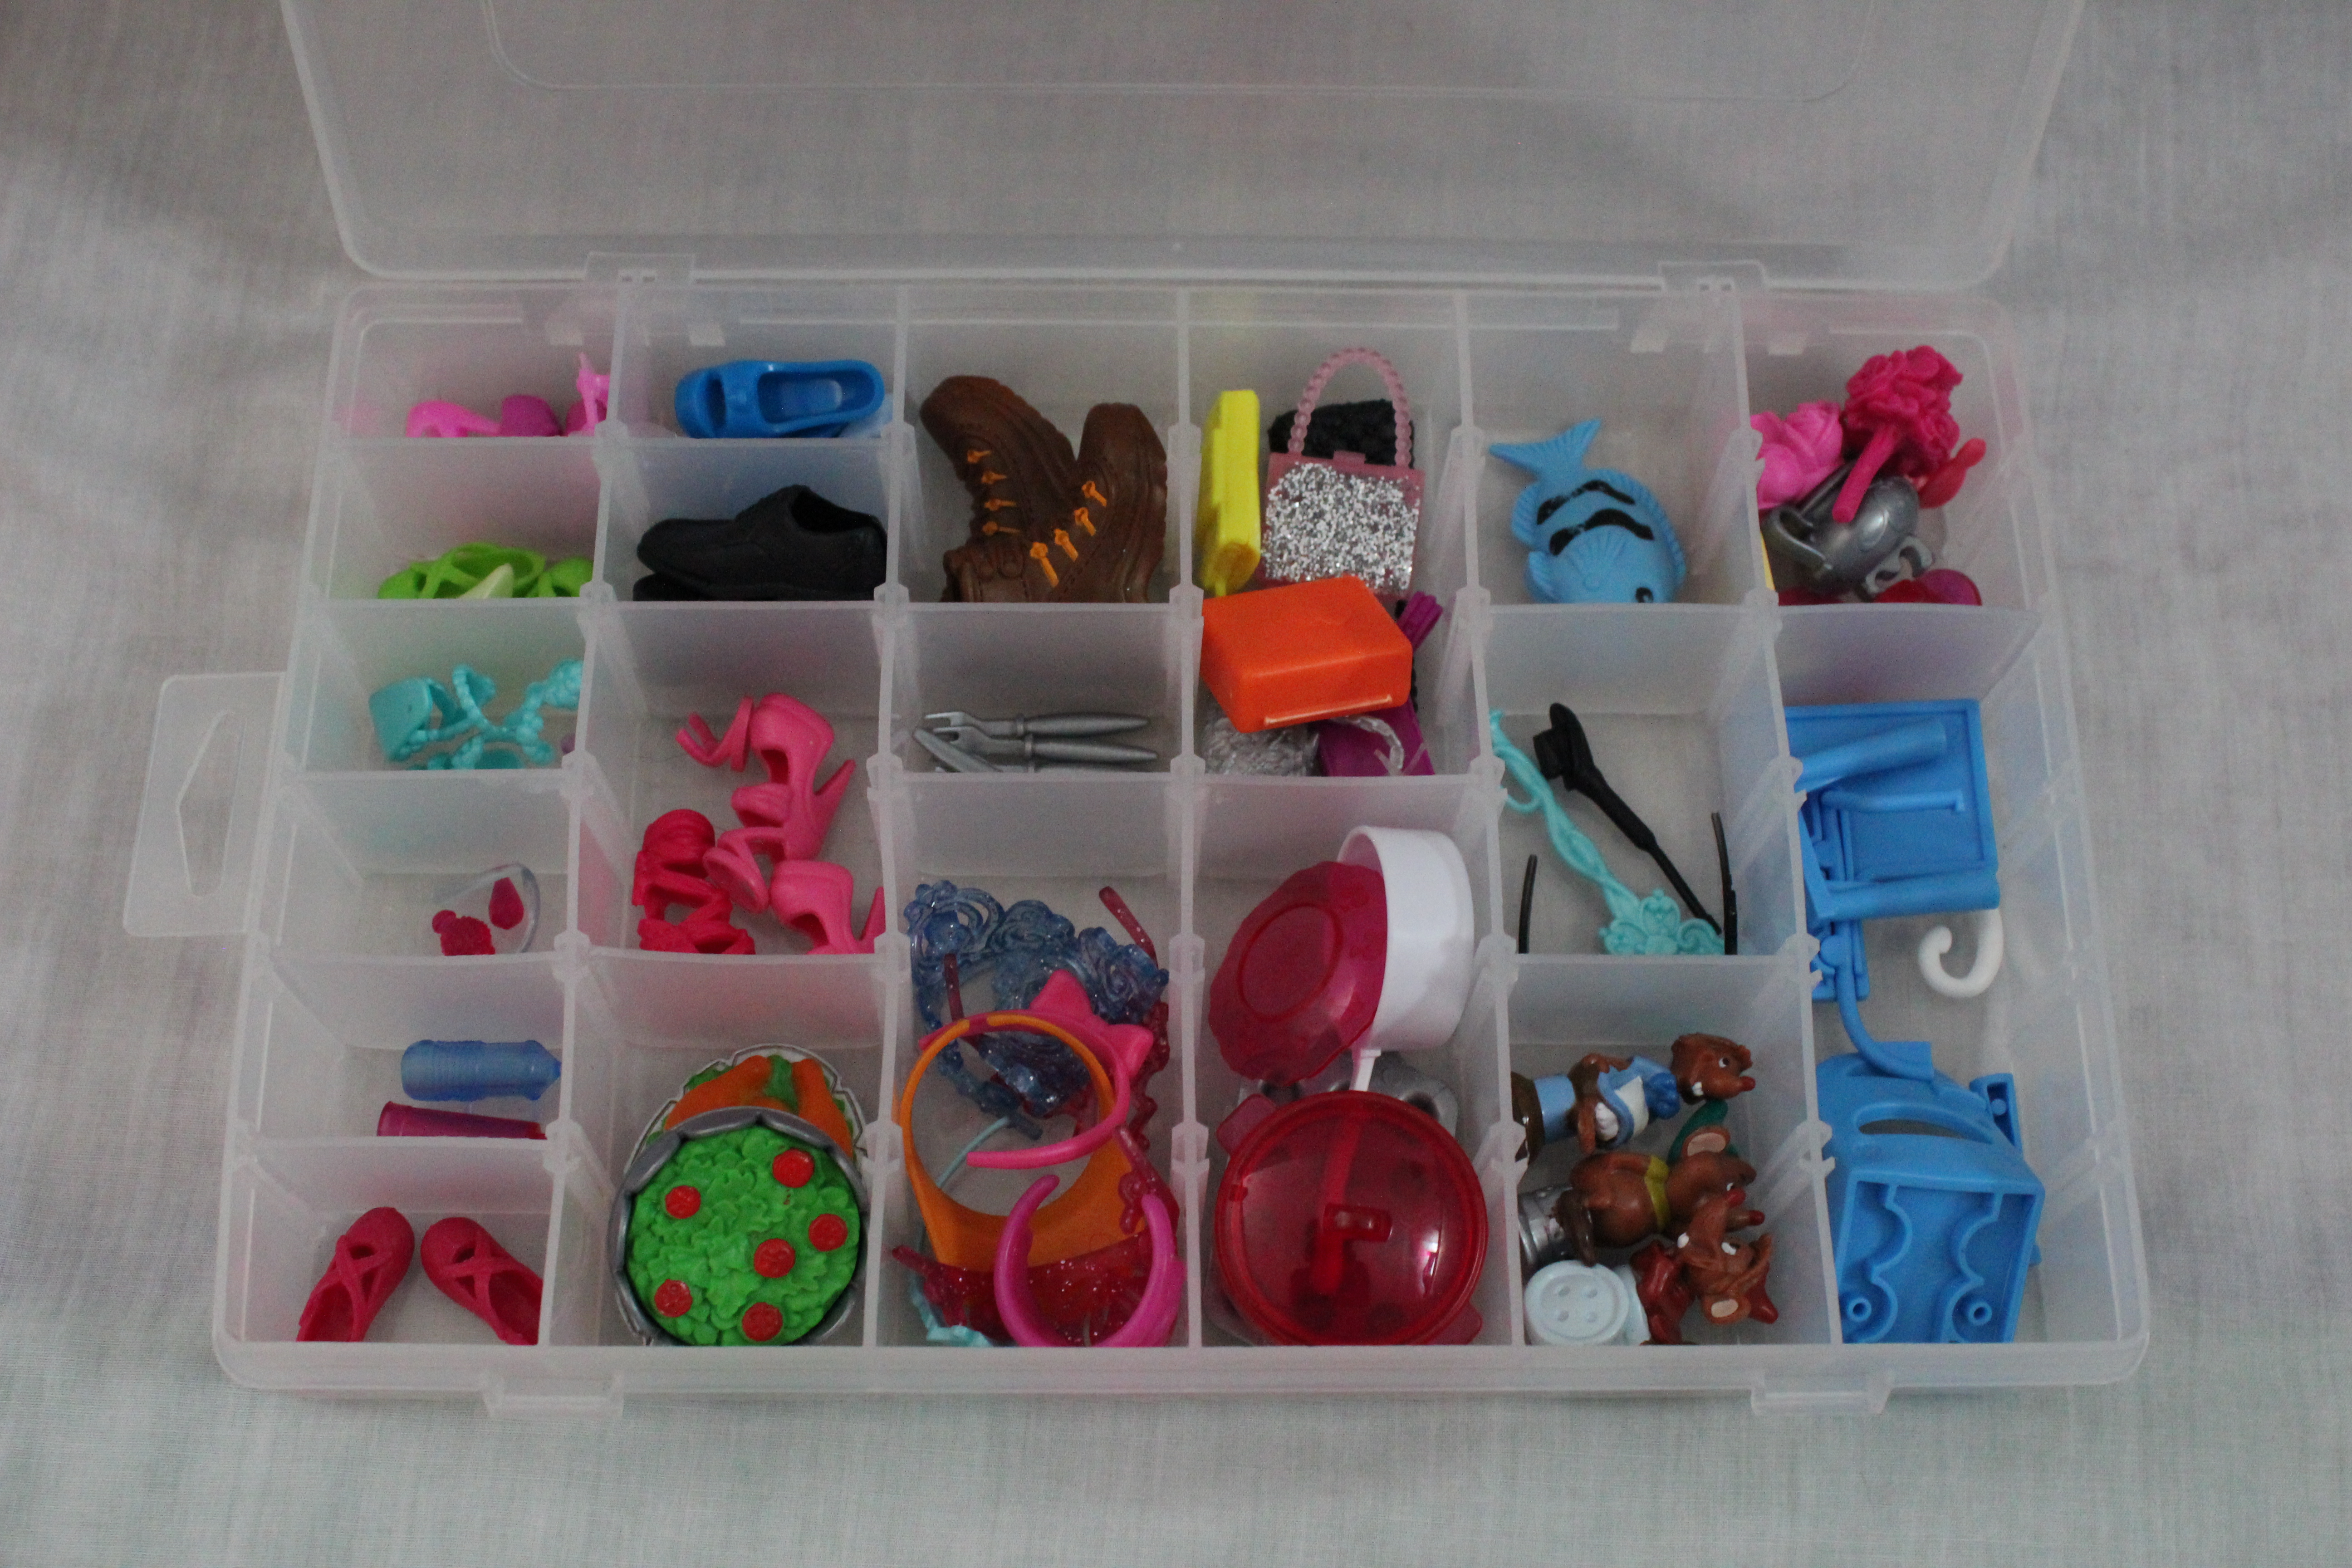
Accessories– A simple divided craft box with lid was the perfect fit to keep pairs of shoes together, silverware, and purses. It makes it so much easier find little things this way.

When kids come over to play at our house, they all want to play with Barbies. I like to think it is because they can easily find everything and let their imaginations fly. At the end of playtime, it is clean up time. Watching kids easily put away all the Barbie toys reconfirms that the system works.

Easy to find and easy to maintain!

Categories : Kids, Simple and Organized, Toys

Organized Headbands & Hairclips

By Tanya Whitford, CPO® on March 30, 2015 No Comments

Organizing Wonders- Organized HeadbandsI have two little girls- and that means a lot of headbands. I tried putting them in a little bucket, then a divided container, but neither worked well. Then I decided to hang them. I took two Command hooks and put them on my daughter’s closet door. Then I put a small curtain tension rod on the hooks. An instant awesome headband rack was created right at my daughter’s level so she can pick which one to wear.

To remove a headband from the middle, simply lift one side of the rod, pull the headband past it, replace the rod, and then pull the headbOrganizing Wonders- Organized Hairclipsand down and out from the others. It was fast and easy to make. It looks great, was inexpensive, and is so user friendly.

What about all the hair clips? Even easier. Just put up another Command hook. Use a leftover piece of ribbon and attach all the clips. So easy to see and easy to put away. If you are doing hair in another location, just pick up the ribbon and all the clips come with you. These things have been working really well for my girls and hopefully they will for you too.

Sometimes you need to think outside of the container for the perfect organizing solution!

Categories : Closets/Clothes, Kids, Simple and Organized

Halloween Candy Overload

By Tanya Whitford, CPO® on October 27, 2014 No Comments

5th grade Halloween CandyI came across this picture recently and it made me laugh. Here I am in 5th grade sorting my Halloween candy as soon as I got home. Must put all Milky Ways together and Hershey Kisses together! A jumble of candy made no sense.  I could better trade with my brothers when I knew exactly how much of each candy I had!

While I still love Halloween and chocolate, I have learned to not eat it so much- and to not allow Reese’s Peanut Butter cups in the house because I will eat them all. So what do you do when you have too much Halloween candy left? Here are 10 things to consider:

1. Don’t do as much trick-or-treating or only allow your child to take one candy from each house- no matter what is offered. They still get to trick-or-treat, but won’t end up with nearly as much candy as they would getting a handful at each house.

2. If your kids are back from trick-or-treating, have them go through their bags and right away give you the candy they don’t like. Add that to your bowl of candy for trick-or-treaters who are still coming to your door- and give away much bigger “servings”.

3. Put half of it away until Thanksgiving and put it out at the family gathering or save it to add to Christmas stockings.

4. Take it to work or the teacher’s lounge at your child’s school.

5. Put them in the freezer to use year round in milkshakes and ice-cream toppings or melt them down to use them for baking.

6. See if your local shelter or food pantry will take candy.

7. Put it on Freecycle. Someone else will definitely want the candy.

8. Donate it to Operation Shoebox or Operation Gratitude who send it our troops deployed overseas.

9. “Sell” it to Halloween Candy Buy Back which works with local dentists to gather extra candy for our troops.

10. Instead of handing out candy, try pretzels or fruit snacks. They sell them in Halloween packaging. Or try stickers or small toys. A treat doesn’t have to be candy.

Happy Halloween!

Categories : Donating & Recycling, Kids, Simple and Organized

Stop the Junk Mail

By Tanya Whitford, CPO® on October 2, 2014 No Comments

No More Junk Mail I overheard someone in the post office ask the clerk how they could stop getting mail for someone who had died years before. The clerk told them to just throw it away. I cringed. That would never solve the problem- and it would waste resources, time, and trees! If you get things in the mail that you don’t want- STOP THEM! Don’t ever think they will eventually tire of sending things to an unresponsive house because they won’t. It is never the last time they will offer you some special deal even if they say it is the last time. And don’t think they won’t share your name with other companies or charities because they might. With junk mail, you have to play some offense and not just muster a little defense by throwing them into the recycling bin.  According to 41 Pounds.org, “An average of 41 pounds of junk mail is sent to every adult citizen each year. Approximately 44% of this mail goes into a landfill unopened.” Not only is junk mail incredibly wasteful to the environment, but it wastes a lot of our time and effort to deal with something on a daily basis that we never asked for.

Have you ever made a contribution to a wonderful charity only to find that you now get requests from 83 other wonderful charities who think you have money to share with all of them? Are you drowning in mailing labels, notepads, and calendars that you could never use up in your lifetime? Do you get credit card offers on a daily basis?  Do you get magazines you never read and don’t even remember ordering? Do you still get catalogs even though you do all your shopping on-line now? You have to do something about it!

I made up some address labels that say in large letters “Please Remove Me From Mailing List”.  When I get something in the mail I don’t want to get again, I tear off their return form, place my sticker above my name (being careful not to cover any codes or info they need to identify me), circle the sticker and my name with a big Sharpie and mail it back to them. Sometimes the envelopes are postage paid, sometimes you need a stamp- but it is worth it! I keep a simple tracking list of the places I have asked to be removed from. It works really well for me and the mail stops coming!

If you don’t have the time or inclination to do this yourself, there are companies that can do it for you:

  • 41 Pounds– for $35 they will contact 20 to 30 direct mail companies on your behalf to stop the majority of bulk mail that comes to your home for the next 5 years.
  • To reduce unwanted catalogs and phone books, try Catalog Choice for free.
  • DMA Choice and Opt Out Prescreen also offer ways to remove yourself from mailing lists.

Throwing away junk mail is not a solution. All that does is leave the door open for more. Be proactive about getting yourself off mailing lists so you can shut the door and windows on the junk mail that takes over our houses! Not only will you reduce waste and help the environment- but you will save time and frustration when you check you newly thinned out mailbox. Enjoy!

Categories : My Blog, Paper, Simple and Organized

Don’t Go Empty Handed

By Tanya Whitford, CPO® on July 7, 2014 No Comments

I learned some very valuable lessons while waiting tables at a busy restaurant in college. You have to stay on your toes and remember lots of details. If it is slow, do your side work so you can finish up faster. And the big one- never go empty handed. If you are walking back to the kitchen, grab any plates that need to be bussed. If you are heading out on the floor, see if any food is ready to go out. There is always something to do to help things run smoothly. You should never be walking around with nothing in your hands!

These same lessons have helped me in my everyday life. I never walk through my house empty handed. As I walk through the living room, I might spot some things that belong in the laundry room or kitchen so I scoop them up and drop them off on my way to the office. As I leave my daughter’s room, I spot the misplaced detangler so I return it to the bathroom on my way to take a shower. It is a constant game of returning things to their homes that just happens automatically and helps maintain things around the house. A little bit here and a little bit there means that things won’t pile up and get overwhelming.

It is a simple concept that takes a little getting used to, but makes a big difference. Next time you leave a room, just grab something that doesn’t belong there and put it where it goes. Don’t go empty handed when there are plenty of things to put away!


Categories : My Blog, Simple and Organized

The Dumping Shelves

By Tanya Whitford, CPO® on May 5, 2014 No Comments
Before

Before

On the way out the back door, we have some great shelves to store all kinds of stuff. They hold everything from cat supplies to bubbles, extra food, beach towels, computer bags, and linens- all out of view behind curtains. It is the ultimate catch all. It started out so nicely organized. And then life got busy, things got crammed in, and it became a humungous junk drawer. I thought the shelves would soon buckle from the weight. I longed for the day when I would have time to re-do the whole thing.

Finally- I found the time. Well, more like I was avoiding doing something else! Luckily the skeleton of the previously organized closet re-emerged once all the excess was purged. Why am I saving all these lunch boxes when the lunch boxes I actually do use are in the kitchen? Maybe all the things in the “Take to Garage” bucket should actually make it to the garage. I don’t even like candles. Why do I have so many and thank goodness my mom wants them and will take them! Are these little drawers still full of crap from my refrigerator door 5 years ago when we moved?! Somehow the new refrigerator got its own set of magnets and photos and left the old stuff in the dust.

After

After

Every once in awhile, we need to revisit our things and lighten the load. It felt so good to finally go through an area that had been driving me crazy. Some things were donated and given away. Some things were returned to their proper homes. And some new ideas emerged. Why not use an empty tissue box to drop all the E-waste, like batteries and cords, until I am ready to recycle them properly. The little box I had before was just too small. Now I have a lot of extra space- almost an entire shelf! It feels really good every time at look at it which is the complete opposite of how it used to feel. We all have some area of our homes that become a dumping ground. Take that time to undo it, organize it, and lighten your load both physically and mentally. It is so worth it!

Categories : Before & After Photos, Simple and Organized

Hanger Clutter

By Tanya Whitford, CPO® on February 24, 2014 No Comments

Hanger ClutterWhen getting dressed, do you pull a shirt off the hanger and leave the hanger or do you actually remove the hanger with the shirt? Sounds simple, but many people out of habit just pull a shirt off and leave the hanger. When you do this continually and then don’t go through your closet and gather all those empty hangers at laundry time, you will end up with a messier closet and less room. One of the first things I do when working on a closet is remove empty hangers- and it can easily be 50-100 hangers! That is a lot of unnecessary hanger clutter that people often don’t notice until all the empty hangers get pulled out.

If you have a tendency to leave hangers behind, try to get in the habit of pulling the hanger and then removing your clothes. Put the empty hanger in a bin in your closet or hang them all at the end of the rod. I drop mine in a laundry basket that doubles as my hamper. That way when I do the laundry, I have all the hangers I need to put the clothes back up. It is a simple habit that will make a big difference in your closet. Save time, space, and frustration by eliminating hanger clutter.

Categories : Closets/Clothes, Simple and Organized

A Handy Basket

By Tanya Whitford, CPO® on February 10, 2014 No Comments

IMG_1476The handled storage basket from the Container Store is one of my favorite products to use for many things. You would be surprised how handy a simple handle can be when you are trying to utilize space on cabinets above your head and below in cabinets. This picture illustrates how I use them for my daughter’s veggie and fruit pouches that she inhales daily. A quick pull from the cabinet so she can see what she wants and then back up they go. The pouches stay organized, easy to see, and easy to grab.

Here are some other uses for these handled storage baskets which come in both a small and large size.

  • All kinds of snacks from pouches to bars to cups stay nicely organized in these. Use one for each household member or each type of food product and line them up on the shelf.
  • Food that doesn’t like to stay put like bags of beans, pasta, and packets.
  • Bath and beauty products can stay corralled in these baskets and slip right under the sink.
  • Bath toys for the kids can be dumped in here. You can actually use the basket as a sieve to scoop up the toys after bath time and just let in drain in the empty tub. The holes come in handy!
  • Vitamins and medicines can be separated (Cold & flu, Indigestion, First Aid etc.) to help get that cabinet full of bottles under control. This is one area where labels on the baskets would be really helpful.
  • Office products like ink cartridges, post its, boxes of staples and paper clips, tape and bags of rubber bands are just a few of the office products you can store in these.
  • Craft supplies such as paints, glue guns and refills, and bags of cotton balls and popsicle sticks can be easily grabbed in a moment of inspirtaion. Keep supplies you commonly use together in the same basket.
  • Cords, cords, and more cords can be separated in these baskets and labeled so that when you are looking for your iPod accessories- you can find them and not hunt through a lot of other cords.
  • Little kid board books and small toys.

The possibilities are endless. When you need to get a handle on things up high and down low, these are some great and inexpensive baskets to try!

Categories : Helpful Products, Kids, Simple and Organized

Year at a Glance

By Tanya Whitford, CPO® on January 27, 2014 No Comments

IMG_2391For the first time in my life, I felt like I really needed to see the whole year at a glance. One or two months at a time would no longer cut it. Not when I get notices in December for a recital that isn’t until June, have constant events at an elementary and pre-school, and a spouse who travels often. Oh yeah- and then there is work! I looked on-line for a nice big year at a glance calendar and was surprised that they were around $25. That didn’t make much sense since I would have to buy one every year. So instead, I bought two large 22″ x 28″ pieces of colored cardboard and simply printed out the 12 pages of a calendar. I used some post-it type sticky glue to stick the pages on the cardboard mat, then stuck the cardboard on the wall. We each got a different colored Sharpie and the filling in began. Now I don’t put regular events on this big calendar. Dance class is every Monday, so there is no need to write that. But any special events and non-regular activities or travel goes up here so we can see it coming.

So far, I really like being able to see my whole year like this. Before when my husband would tell me that he would be traveling for a week 4 months from now, I couldn’t really wrap my head around it. Now it goes on the calendar and I can see when I need to start planning for that week. I keep my regular calendar on my computer where I enter the recurring events, work, and things to do so it can sync with my phone. Then I add things from the big calendar as the time approaches.

Aside from it being really inexpensive to make your own big wall calendar, it also gives you an advantage. Rather than having to wait for the next year’s calendar, you can start adding pages for the following year as the months pass. I figure that by June, I will probably replace the first few months that are over with fresh pages for 2015. Sometimes it is better to just make something the way it will work for you!

Categories : Simple and Organized, Time Management

Organizing the Desk Junk Drawer

By Tanya Whitford, CPO® on December 2, 2013 No Comments
IMG_1397

Before

Just for fun, I thought I’d organize the junk drawer in my husband’s desk with my 5 1/2 year old daughter. These are the crazy things organizers do for fun! When a desk drawer is jammed full of seemingly random items, the drawer loses all functionality. Searching for items lost in the drawer just makes it more of a mess- and you probably won’t even find what you thought was in there.

My daughter and I pulled out the desk drawer and put it on the floor. Then we quickly got to work. Here is what you should do:

  1. Empty the drawer putting everything in groups of like items. All the pens together, receipts, coins, etc.
  2. Throw out/recycle any broken or no longer useful items. (Donating useable items if possible of course!)
  3. Purge or at least organize your business card collection into a more useable system- even if that just means putting all the restaurants in one pile and colleagues in another.
  4. Relocate any items that don’t belong in the desk drawer.
  5. Use small baskets, check boxes, extra food storage containers, ziploc bags- whatever you have on hand- to separate and store each grouping of items.
  6. Like a puzzle, fit all the small storage pieces you are using back into the drawer with things used most in the front and things used least in the back.
IMG_1400

After

My daughter enjoyed sorting things and figuring out what would be best to store each category. In less than 10 minutes, we had a beautiful looking desk drawer, my daughter learned some valuable organizing skills while having fun with mommy, and my husband got a desk drawer he can actually find things in!

Categories : Before & After Photos, Kids, Simple and Organized
Next Page »
Organizing Wonders
Copyright © 2002-2025. All Rights Reserved.